
If you have been following my blog, you will know that I recently visited the magical Isle of mull, off the West coat of Scotland in search of Otters and encountered a wide range of wildlife and landscapes during my trip. During the visit, I took a boat to the Isle of Staffa to see Fingal’s Cave, known to many through Mendelssohn in his Hebrides Overture.
I arranged for the boat to leave me on the island for a couple of hours and planned to use my ND10 filter to create a distinctive long exposure with the trails of the wave motion creating a misty blur among the static sharp rocks. This is a technique which polarises opinion – some love it and some hate it. Personally, I love the misty effect on moving water
The ND10 is a super dark filter which screws into the end of the lens. It allows only 1/1000 of the light through to the camera sensor and enables you to take very long exposures (upwards of 30seconds) in broad daylight. I set the tripod up, but………………..no filter :0(
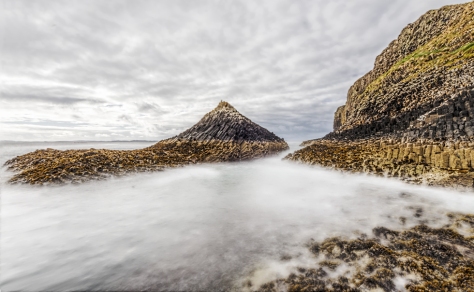
As per the title, Necessity is the Mother of Invention, I decided to try taking a series of photos with the view to merging in Photoshop to give an approximation of a single long exposure effect. The result, merging 22 shots, seen at the top, is rather good for a “Compromise” :0)
Now for the numbers part and the merging in Photoshop, so no need to read if you already have an ND filter or if you fall into the “Hate it” category of ND10 usage! Ignore the words (they are not too exciting) and go to the bottom for a chart to give you a quick reference if you ever want to use this method
You need to add each shot into layers to enable merging. Assuming that you have used a tripod, the layers should be aligned, but failing that if you use photomerge, Photoshop will attempt to align for you will.
Now you have to consider how each layer contributes to the final photograph. You need to think how much each layer shows of itself and how much it allows through from layers below so that the combined layers contribute to 100%. instinctively you might think that you would assign equal opacity to each layer, so that for 10 shots you would give 10% opacity to each layer. not so….! Consider a single shot. this must have 100% opacity. Add another layer, you want 50% of each to contribute to 100% overall. The top must have a 50% opacity , which gives 50% of itself showing in the final shot and allows 50% of layers below transmitting through. If you took both layers at 50%, then the lower layer at 50% would have 50% transmitted leaving 25% coming through to the final shot, so only 75% overall reaches the end result. So, if we keep the lower layer at 100%, 50% of that transmits, and combined with the 50% top layer gives you the 100% required. Now add a third layer. Each layer must contribute an equal 33.33% to the shot, so the top layer must be set to 33.33% opacity, thereby transmitting 66.66% from layers below. Keeping layer 2 at 50%, 66.66% of that transmits ie 33.33% and keeping the 3rd layer at 100%, 50% of that transmits to layer 2 and 66.66% then transmits to the top layer, giving an equal 33.33% contribution to each.
The pattern continues, so that the opacity settings from the bottom to the top are set at the inverse of the layer number. Here is a table to show you the settings for the 22 shots I combined to produce the main photo.
| Layer | Opacity |
| 1 (Bottom) | 100.00% |
| 2 | 50.00% |
| 3 | 33.33% |
| 4 | 25.00% |
| 5 | 20.00% |
| 6 | 16.67% |
| 7 | 14.29% |
| 8 | 12.50% |
| 9 | 11.11% |
| 10 | 10.00% |
| 11 | 9.09% |
| 12 | 8.33% |
| 13 | 7.69% |
| 14 | 7.14% |
| 15 | 6.67% |
| 16 | 6.25% |
| 17 | 5.88% |
| 18 | 5.56% |
| 19 | 5.26% |
| 20 | 5.00% |
| 21 | 4.76% |
| 22 (top) | 4.55% |


Excellent final result James, looks really good. Some great number crunching too. Really well done Sir 🙂
LikeLike
Much appreciated Sir :0)
LikeLike
Wow. Now I understand why you are a finance guru, working out the work around. I’ll try not to forget my big stopper. Excellent result.
LikeLike
Cheers Andrew (Finance and a degree in Chemistry!) I enjoyed the thought process. Lovely to see you up and blogging. Have a great Christmas
LikeLike
There is always another way! Although I’m not sure I would have thought of this one!!
It is real treat to see a bird that you have dreamed of – Hoopoe and Hummingbirds are two that I have seen in the last couple of years.
Hope you have a good Christmas.
cheers – Stewart M – Melbourne
LikeLike
Cool photo!
LikeLike
Many thanks indeed! It is a gorgeous bird and it posed very nicely for me!!
LikeLiked by 1 person